Wednesday, September 30, 2009

Small But Sweet

Before I left my daughter to go back home to the real world, she requested that I decorate her apartment for fall.Occasionally someone will leave me a comment, after I've shared holiday photos of my home, saying things like, "I wish I could decorate for the holidays but my home is too small." Or, "I can't afford to decorate." Or "I have no place to store decorations." Hopefully these photos will inspire those who live in smaller homes.My daughter keeps holiday decorations in plastic containers tucked under their bed. Most of the decorations were purchased at the dollar store, thrift store, or discount store. And as far as room to display, that's easy!
Place a few on top of furniture.
Clear a spot on a table or chest.Tuck them into a bookshelf.Replace candles for decorations.Hang 'em on a coat rack.

Monday, September 28, 2009

New York, New York

My daughter treated me to a bus ride up to New York city for a weekend visit. We stayed with a really cute and gracious couple who live there, which was nice because they knew the area and could help us find great ways to spend our time. We spent much of Saturday shopping flea markets.
We had so much fun! It was part of a perfect day in the big city.

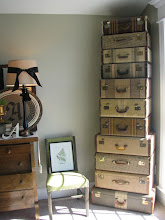
We went to one market that's housed in an old parking garage. Oh there were so many things that I would have loved to take home, but I resisted.We also shopped at the Hell's Kitchen flea market. I did find a little something there that I couldn't resist. This cute little suitcase.Isn't it the perfect topper for my stack?

Friday, September 25, 2009

A Grown-up Room

Remember when I told you that I was helping one of my daughter's friends do a master bedroom makeover? I teased you with this photo of items that she purchased at the thrift store. Along with the items in the shopping cart, she also bought a headboard and dresser. Then she purchased another inexpensive dresser off of Craigs List.
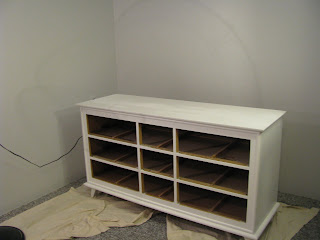
This is what the master bedroom in their basement apartment looked like when I first saw it.
Like most young couples their furniture consisted of freebies and mismatched finds. The room wasn't a true reflection of this cute couple. They didn't feel good about it''s appearance and as a result it had become a catch-all. And, like most young couples, when they did purchase new furniture it was for the baby's room, not theirs. Fortunately they were at the stage where they were ready for a change, even though the change had to be done on a shoestring budget. I met with them to discuss their vision, gave them some ideas and shared some photos to give them inspiration. Then we went shopping at the thrift store to pick furniture and accessories and to the home improvement store to pick paint. We picked Behr Paint and Primer in Subtle Touch for the walls. It's a light gray with a hint of lilac. The furniture paint is Polar Bear, a soft white.
They spent several late hours, after their baby was asleep, painting walls and furniture. It was long, hard work, but I assured them that it's always good to have a deadline for a project and their hard work would be worth it.
When I next saw their room, they had it emptied out, with all of the painting done. I started my part of the work by distressing the newly painted furniture. It's nice to have a little distressing from the beginning, that way when life gives the furniture an occasional nick or bump it will only add to the character. Then my favorite part began, moving furniture and accessorizing. Oh how I love to accessorize a room! It was so fun to pull together the thrift items along with goodies that I grabbed from other parts of their home, like a beautiful mirror that was in the living room but looked so much better in the bedroom.
This is what the room looked like after.
It no longer looked like a dark basement room. It was now fresh and light. We even managed to give them full length curtains on the tiny window to give the feel of a bigger window. There was no way I could hang a curtain rod with that annoying pipe. So, since they didn't need the privacy, I did the next best thing and used pretty upholstery tacks to do the job. Do you notice how those pretty thrift store finds help to bring in a little sparkle, add the green accent color, as well as give the room a sophisticated, finished look.They are both very talented photographers so I included several empty frames for them to fill with gorgeous black and white photographs that they've taken. One of my favorite accessories was an old camera (on top of the dresser) that they had purchased for a dollar at a flea market.They already had the two nightstands, although they weren't really using them before. They painted them both a beautiful gray to contrast against the light gray walls and white headboard.The lamps were a thrift store find.It was so much fun to give this sweet couple a beautiful room to retreat to at the end of the day, and to do it on a tight budget. I estimated that the total cost for furniture, paint and accessories was about $300. I loved their reaction! They couldn't believe it was their room. They felt like they had gone from a college dorm to a honeymoon suite. They said that they used to hurry to close the door of their room when they had guests over. Now they were so excited to have guests come stay in the room. And all it took was some creative shopping, and a lot of paint and hard work.

Wednesday, September 23, 2009

A Delightful Statement

On my last trip to visit my daughter I helped her move in and
decorate their new apartment.
She is so happy with it, but as we sat at the kitchen table we decided that there was something lacking. The sofa in the living room is such a beautiful statement piece that when you walk into the kitchen it's almost disappointing. The light fixture was so old, ugly, and boring. I took on the challenge of finding a cure for her kitchen blahs. I found a chandelier at the thrift store for about five dollars and I snatched it up. My daughter was thrilled and gave me carte blanche on it's makeover.
Her kitchen is a pale green and there is green in the sofa, so it only made sense (to me) to paint the chandelier a gorgeous leafy green. I was so excited that I started painting before I took a "before" picture.
If you look very closely you'll see that it was originally the shiniest, yellow-ist brass that a fixture can be.And yes, I hung it in a tree and spray painted it in the dark.
Once dry all that was left was to install it---which proved a bit tricky. I've never actually installed a light fixture. I've always assisted in the process but this was my first time to actually do it, all by myself.
And I must say that, although it took me a while, I'm so proud to admit that I am now an accomplished chandelier installer!
The chandelier looks fabulous and really compliments the rest of the apartment.
After I installed it I noticed a broken candle holder close by that had square crystals and knowing of my daughter's love for all things sparkly, I took the holder apart, strung the crystals together and hung them on the chandelier. I think that it's just the perfect finishing touch!

Monday, September 21, 2009

A Dining Jewel

My daughter's friend recently moved into a new apartment. It's the first floor of an old home that retains many of it's old fashioned charms like hardwood floors and this small built-in china cabinet in the corner of the dining room. 
Doesn't it look sweet, filled with an heirloom china tea set that belonged to her husband's grandparents?
However, that's all the storage area this room offers. And she owns a lot of beautiful dishes. She needed a place to house her dishware and linens. When she saw this beautiful piece at the thrift store, she fell in love.
She debated a bit but with my nudging, combined with the fact that everthing was 25% off that day and it would cost less than $40, she made the purchase.
The wood is similar in color to her dining set and the vintage hutch is right at home next to the modern pieces.
(Notice those gorgeous candlesticks? They were also a thrift purchase that day.)
She gathered all of her dishes and let me play and arrange. When I was finished we were both ecstatic.
When displaying dishes in the open, it always looks best when there is balance. Do you see how every shelf contains something that is red, gold, cream and glass. Even the patterns are spread throughout. And just for fun we added two huge pears ($1 each thrift finds). 
Now all that's left is to add new hardware and this thrift store find will be the jewel of the dining room.

Friday, September 18, 2009

A Thrifting We Will Go

It's fun to see all of the tourist spots when you're on vacation, but one of my favorite spots to visit has been (I know you'll be surprised) a GIANT thrift store called Unique.
This place is huge!
With rows and rows of treasures just waiting to be found. We spent hours searching for goodies. 

The prices were better than my thrift stores back home.
I went there with two of my daughter's friends who were searching for things to decorate their apartments.

Both girls found incredible buys on furniture pieces. 
Look at the cart full off goodies one friend found.
We're redesigning her master bedroom and using many of these items. 
I'm helping both girls decorate their homes in exchange for letting me share the before and after photos with you.
I managed to find a couple of treasures myself. 
A small German silver container, a footed silver tray, a milk glass vase, and a cream vase to add to my collection.
As well as a chandelier (photos to come), and two pretty silver trays---the round one is for me and the rectangle one was a surprise for my daughter who had to work while we thrifted.
I'm so excited to show you what we did with many of treasures we found.

Wednesday, September 16, 2009

Growing Inspiration

Oh how I would love to incorporate some of these ideas from the Botanic Gardens in DC.Huge pots packed with plants and flowers. Don't you adore the overflowing potato vines.
I would really enjoy having a large rosemary bush like this one.
I would loooove to have rows of boxwood bushes!
I'm already planning on planting rows of grasses similar to this.
Don't you think that this is an awesome way to grow tomatoes?
I wish I could find a spot to plant two shades of ground cover plants in long rows with a garden statue in the center.My very favorite idea was this checkerboard design made by alternating ground coverings and small, smooth black stones.
Isn't it beautiful!

Related Posts Plugin for WordPress, Blogger...


Munchkin Land Designs  


Search This Blog