Monday, February 27, 2012

A Fresh Mantle

I found this beautiful oil painting at the thrift store for a $1.50. The painting and my newly crafted moss monogram were the inspiration I used to freshen up my mantle.Making a moss monogram was so easy! I simply traced around the letter onto the back of a moss mat (ready-made moss glued onto netting, purchased at the craft store). Then I cut and hot glued the moss pieces onto the monogram. I added faux nature onto my mantle---a flower resembling those in the painting, and a pot of grass to balance the moss letter. On the other side I placed two yellow ceramic artichokes and a tall pink orchid that mimic the colors in the art. All that was needed to complete the mantle was a few brightly colored books and a couple of shiny candlesticks (my favorite go-to items in decor!).
And there you have
a fresh, ready-for-spring mantle!


This post linked to:
The Lettered Cottage

Friday, February 24, 2012

A Quick Mix

I quickly threw together this
little vignette in the landing of our stairwell.I think it's the perfect mix---
masculine and feminine elements,
faux and real nature.It's fun when things come together
without a lot of thought or time!

***Enter to win a Cutting Edge Stencil here***

Wednesday, February 22, 2012

A Bedroom Retreat

Son #3 just returned home after two years of serving our church in New Zealand. As a welcome home I gave his small bedroom a makeover using furniture from our storage and the thrift store. Even the prop hanging above the closet was a thrift store find.We've owned the lawyer bookshelves for years. They've been used in the family rooms of two of our homes.We pulled the vintage chest of drawers out of the garage. They were used by my husband years ago when my style was a bit more country. A change of hardware gave them a nice update.My favorite piece is the antique bed, a thrift store find. The details are stunning! It likely was originally a tall four post bed; what remained of the posts had been attacked with a saw and were rough and uneven. My husband cut, filled, and sanded, then I stained the ends and now they look original.
Although the room is small (about 10'x10') I love the way the large furniture pieces make the room warm and cozy.
I'm pretty pleased with how the budget bedroom makeover came together and so is my son.Link

Monday, February 20, 2012

A Fun Retreat

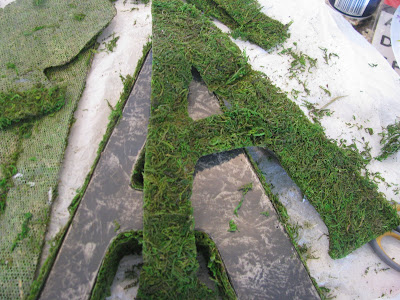
Last week I was invited to go to an all girls retreat at my friend's beautiful cabin. I was both excited and anxious---excited to get away for a much needed break; anxious because ALL of the other ladies are expert quilters. I wondered how I would spend my time while they pieced and sewed. Most of my projects of late have been large, involving rooms or furniture in my home. . .nothing conducive to a weekend getaway. I was at a loss as to what to do. One son suggested that I take the break to plan future projects. A friend proposed that I bring magazines or books. Both were wonderful ideas but I felt the need to be creative alongside my friends. So I threw together several things I had lying around my home, items I had purchased earlier hoping one day to try my hand at creating.While my friends cut fabric scraps for quilts I used their cutting tools to cut apart dollar store t-shirts. Using the cut apart t-shirts I made necklaces with the help of this tutorial.I learned how to "finger knit" with the help of this post. It was so easy and fun that I made a brown friendship bracelet for each lady on the retreat.I covered a metal letter "A" with moss. And used my friend's cabin decor to stage this glamor shot.While my quilting friends were busy sewing I stayed busy creating words with wire similar to one I made here. I plan to use these as gift tags. I even crafted up several of these wire "eat" signs for my friends to take home and stick in breads, cakes, or anything they're serving to family and friends.I had so much fun with my creative and loving friends! I came home energized and happy. It's amazing how a little girl-time and crafting can energize one's soul!
Have you entered to win a Cutting Edge Stencil? If not, enter HERE.

Wednesday, February 15, 2012

The Evolution of a Wall and a Giveaway

Our dining room
is really more of a nook off of our living room.
The living room has vaulted ceilings. However the dining area's ceiling is the traditional 8 feet
making it seem like a design afterthought.
Years ago in an attempt to give the dining area
a little more character I gave the far wall a
special color and plaster treatment.
I loved that it drew one's eye to the little nook,
even when viewed from outside our home.
I adored the dark green aged wall, but last year I was
ready for a change
.
I began by painting the wall a very dark blackish-green
with the idea that I would put a light gray glaze on top to
give it the look of a well used chalkboard (without the mess of chalk).
It turned out to be not as pretty in real life
as it was in my mind.
I was so disappointed that I didn't even photo it.

Next I found a geometric shape that I liked
so I enlarged, repeated, and painted it on the wall.
Again the design didn't thrill me.
I then asked myself what it was that really bothered me about the previous design attempts. I discovered the problem was that I really was tired of a dark painted wall.
My next step was to paint the wall the same color as the other walls.
This gave the area the fresh, new look I'd been wanting.
But I still wanted the wall to stand out so I considered my options. I thought I would try my hand at the new type of wall stencil. I have stenciled walls before, years and years ago, when stencils were small and tedious to use. But the new stencil designs are so much better! I ordered the Marrakech Trellis Allover Stencil from Cutting Edge Stencils. Let me tell you, this isn't anything like stenciling in the 90's! The stencil is huge and easy to use. Instead of a little stencil brush to paint on the design you use a foam roller. And probably my favorite thing (because I tend to be a bit of a perfectionist) is the little level that you can attach to the stencil to keep it lined up perfectly. If you're a novice at stenciling you can watch the how-to videos on the Cutting Edge site. I reviewed the video just to regain my confidence in stenciling.
With a lot of patience, trial and error,
and the use of the beautiful Marrakech stencil design
our dining wall now has that

"wow factor" I've been searching for.If you're searching for a wow factor for your home
Cutting Edge Stencils is giving away
a choice of stencil (up to a $50 value)
to one very fortunate Joys of Home reader.
Just go to their site, pick your favorite stencil and come back here and leave a comment. For additional entries Like them on Facebook, &/or Pin them on Pinterest, &/or follow them on Twitter---for a total of four entries!

The giveaway will be open until midnight Leap Day, February 29th 2012. Best of Luck to all of you!!!
***GIVEAWAY IS NOW CLOSED***

Monday, February 6, 2012

A Shelf Story

You've seen the shelves in our family room before but I don't think that I've told you their story. Several years ago I dragged my husband into a quaint little consignment shop. While I was there enjoying all of the furniture and home accessories, my hubby stood enamored with metal items piled into an old wooden crate. He was so excited with the contents, asking if I knew what they were. I was clueless as to their use so he explained to me and the shop owner that the vintage metal pieces all fit together into a shelving system. Once I understood what that old crate held I was enamored too! After a little dickering on the price we walked out of the store as happy, chippy shelf bracket owners.Sometimes it really pays to drag a husband into a quaint little shop!

Friday, February 3, 2012

Lamps, Shades, and Hot Glue Tips

When I changed the color of the walls in our family room
from red to brown it caused
a do-over domino effect
on several other items in the room.
All of the lamp bases in this room were black
but now they lacked pizazz against the brown.
I replaced a few lamps using ones I had
in other areas of our home.
And then I gave the two large lamps behind the sofa
a pretty little make-over.

(And the door sofa table got a fresh coat of paint too!)First I spray painted the bases an aged brass color,
then rubbed on a glaze to bring out the details.
Then I changed out the shades with ones
I found at the thrift store.
The drum shades originally had a pom-pom accessory
from it's previous owner.
I pulled off the trim,
unfortunately some of the hot glue remained.
After a quick Google search I discovered that
rubbing alcohol helps remove old hot glue.
And it really does work magic! (There was only a very slight remnant of glue left in spots
where the glue was really hot when applied)

I finished off the shades a new,
more sophisticated trim.
Now I'm in love with my lamps once again!
Related Posts Plugin for WordPress, Blogger...


Munchkin Land Designs  


Search This Blog